
Authentication in Nodejs using JSON web tokens (JWT)

Hey there, In this article, we would be learning how to implement authentication in nodejs using express and JWT aka JSON web tokens
What are JSON web tokens?
JSON web tokens or JWT is a simple long string that contains some data in an encoded way. Sounds confusing? here is an example
A Sample JWT String may look like:
eyJhbGciOiJIUzI1NiIsInR5cCI6IkpXVCJ9.eyJuYW1lIjoiUGl5dXNoIEdhcmciLCJlbWFpbCI6ImluZm9AcGl5dXNoZ2FyZy5kZXYiLCJpYXQiOjE1MTYyMzkwMjJ9.XaQC6iMAgESX8b-HT2AkclCAWDnAmNiHV7tq7b6GWRE
Now, Let’s decode the above JWT string
You can decode the string by visiting https://jwt.io/ and paste the above string into the debugger present on the mentioned link.
{
  "name": "Piyush Garg",
  "email": "info@piyushgarg.dev",
  "iat": 1516239022
}
So, I hope that now you have a simple idea that what JSON web tokens are!
Now, with that being set let's create an express application and implement authentication with JWT
I'll be guiding you step by step and I would highly recommend you to code along with me.
Step 0: Creating a boilerplate code.
const express = require('express');
const cookieParser = require('cookie-parser')
const app = express();

app.use(express.json())
app.use(cookieParser())

app.get('/', (req, res) => {
  res.send('Welcome to my API')
})

app.get('/profile', (req, res) => {
  res.send('Hello')
})

app.listen(9000, () => console.log('Server Started at PORT 9000'))
A very basic express starter code. We would be protecting the ‘/profile’ route so that only logged in users can access that route.
Step 1: Installing Dependencies
For this project, we would be installing a few dependencies.
Express
jsonwebtoken
cookie-parser
Run the following command in your terminal or command prompt:
npm install express jsonwebtoken cookie-parser
Step 2: Creating Middleware functions to deal with tokens
In this step, we would be creating functions which would be used as middlewares to protect our certain routes.
Trust me it's really simple 😉
Creating auth.js
So, Create a new .js file in your project directory. Lets call it as auth.js. In this file, we would be creating functions that we need to deal with tokens.

Great going, Now let's create a couple of functions
generateToken(): This function would take data as a parameter and return the token after generating it.
isLoggedIn(): This function is responsible for checking if the current user is logged in or not.
Yeah! That's it. Lets Codeee 🤟🏻
const jwt = require('jsonwebtoken');

function generateToken(payload) {
  const token = jwt.sign(payload, 'mySecretKey');
  return token;
}

function isLoggedIn(req, res, next) {

  // Check if the user has token in cookies. If not return the request;
  if(!req.cookies.jwt) return res.json({ error: 'Please Login' });

  const clientToken = req.cookies.jwt;

 try {
  //  Decode the client token by using same secret key that we used to sign the token
    const decoded = jwt.verify(clientToken, 'mySecretKey');
    req.user = decoded;
     next();
 }
 catch(err){
    return res.json({error: 'Invalid Token'})
 }

}

module.exports = {
  generateToken,
  isLoggedIn
}
In auth.js we have created two functions as mentioned above. Please go through the code and you would understand the flow behind it.
Yep, that's it. Now let's protect our routes
Back to index.js let's create two routes signup route and login route.
In this article, I’ll be coding only the signup route.
Your assignment is to create the login route.
const express = require('express');
const cookieParser = require('cookie-parser')
const app = express();

// Import auth.js that we created earlier
const auth = require('./auth');


app.use(express.json())
app.use(cookieParser())

app.get('/', (req, res) => {
  res.send('Welcome to my API')
})

app.get('/profile', (req, res) => {
  res.send('Hello')
})

app.post('/signup', (req, res) => {
  const {name, email, password} = req.body;
  // .. code to save user in database

  // Now lets generate token and give it to user as a cookie
  const payload = {
    name,
    email
  }
  const token = auth.generateToken(payload);
  res.cookie('jwt', token);
  return res.redirect('/profile')
})

app.listen(9000, () => console.log('Server Started at PORT 9000'))
Step 3: let's protect our route
To protect your route, just call the isLoggedIn function as middleware before the route that you want to protect and that's it.
Updated profile route:
app.get('/profile', auth.isLoggedIn, (req, res) => {
  res.send(`Hello ${req.user.name}`);
})
req.user holds the current user which is logged in. Navigate to auth.js line number 18:
req.user = decoded;
This is where we set the value of req.user to the current user.
Value of req.user is exactly the same as we defined the payload while generating the token.
Finally: Let's test our implementation in postman


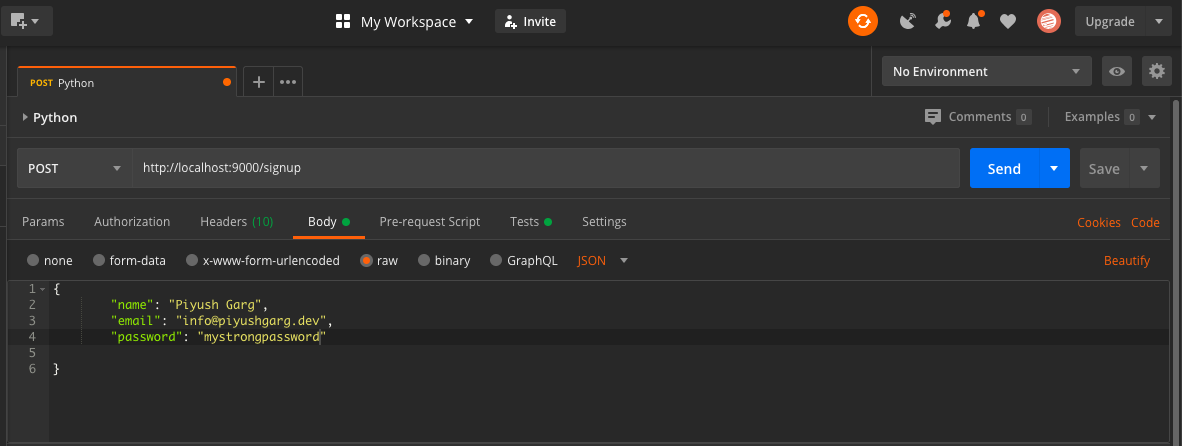


Congratulations! 😍 You have now learned how to do authentication in nodejs using JWT
Building REST API with Node.js Build your own REST API from scratchmedium.com Top 10 visual studio code extensions 2020 Best vscode extensions to make your development smooth and powerful.medium.com How to create a VS Code extension Hi there, in this article we would be creating an extension for VS Code and publishing it to the vscode marketplace.medium.com
Social Links:
Github: https://github.com/piyushgarg195
Linkedin: https://www.linkedin.com/in/piyushgarg195/
Website: https://www.piyushgarg.dev/


