
Building REST API with Node.js
A few years back, the only way to run a javascript code was in web browsers. But after the birth of Nodejs, we could run javascript code outside of the web browser.
Node.js provides a run time environment to run javascript code. It is built on the chrome’s open-source V8 engine.
After being said that let's build a real REST API in Node.js & Express from scratch.
I'll be guiding you step by step with a detailed explanation from installing node to building our restful API.
Now, What is an API? 🤷🏻♂️
API stands for Application Programming Interface. Yes I know it’s too much jargon.
In simple terms, API is a service that is used to deliver data and the content between the server and the client.
So let’s build our very first API 😍
Step 1. Download and Install Node.js
To download and install node js on your machine, head over to https://nodejs.org/en/ and select your download version.
There are two types of download version:
LTS — Long Term Support
Current Version
In this tutorial, I would recommend you to download the LTS version as it’s more stable.
Download Link: https://nodejs.org/en/
To Verify your installation open your terminal (macOS) or Command Prompt (Windows) and type “node — version”. This will show your current installed version of nodejs on your machine.
Congrats! you have successfully installed nodejs on your machine.
Step 2: Setting up the project folder
After you have successfully installed node on your machine, lets set up our project structure for building API.
Step 1: Create a new folder, let's name it as “myApi”
Step 2: Open terminal or command prompt and navigate to the recently created folder i.e “myApi”.
Step 3: Setting up package.json
Every node project has a file named as package.json. This file contains some configs and names about your project. This file also keeps the track of the dependencies and packages used in our project.
To create a package.json, In your terminal or command prompt type
npm init
in your project folder and press enter. At this step, npm would ask you some questions like name, description, etc. Keep pressing enter key to accept all at default names.
Now you have successfully created your own package.json file.
{
  "name": "myapi",
  "version": "1.0.0",
  "description": "",
  "main": "index.js",
  "scripts": {
    "test": "echo \"Error: no test specified\" && exit 1"
  },
  "author": "",
  "license": "ISC"
}
Please do verify that package.json is created inside the folder.
Create an index.js file
Note: If you had a look on to our package.json file, there is a key named as “main” and value is “index.js”, which means that index.js is the entry point of our application. So we need to create an index.js file in our project directory.
Our Project Structure:
myApi
|- index.js
|- package.json
Huraa! 🎉 our project is now set up and we can finally move on to code our API.
Step 4: Install dependencies
Before we get started to code our API we need to install some dependencies in our project.
Installing dependencies is really simple. All you need to type is a command in your terminal or command prompt.
For this project, we need a dependency i.e express.js
Command:
npm install express
Express is a minimal and flexible Node.js web application framework that provides a robust set of features for web and mobile applications.
At this point a package.lock and node_modules folder would be created in your project directory. node_modules folder contains the source code of your all the dependencies that you install (express in our case).
Step 5: Lets Code! 💻
Open your index.js file and code along with me.
// Import the Express using require() module
const express = require('express');

// Initalize express app
const app = express();

// Lets create Fake Data for api
const userData = [
  {
    id: 1,
    name: 'Jhon',
    age: 20
  },
  {
    id: 2,
    name: 'Jane',
    age: 23
  },
  {
    id: 3,
    name: 'Tim',
    age: 34
  },
];

// Create Endpoints for API

// Endpoint 1
app.get('/api', function(req, res){
  res.send('Welcome to our API')
})

// Endpoint 2
app.get('/api/users', function(req, res){
  res.json(userData);
})

// Endpoint 3
app.get('/api/user/:id', function(req, res){
  const id = req.params.id;
  const user = userData.find(user => user.id == id);

  if (user) {
    res.json(user)
  }
  else {
    res.send('No User Found')
  }
})

// Start the Server
const PORT = 3000;
app.listen(PORT, function(){
  console.log('Server Started')
})
So firstly we will import express in our application using require() function and store it into a variable express.
const express = require('express')
Now, the express module that we have just imported returns a function which we can store into a different variable. By convention it is named as an app;
const app = express()
Great going! Now let's create a fake array of users which we would serve to our clients as an API.
const userData = [

{

id: 1,

name: 'Jhon',

age: 20

},

{

id: 2,

name: 'Jane',

age: 23

},

{

id: 3,

name: 'Tim',

age: 34

},

];
Feel free to add more users or data. 😉
Now we are finally ready to create our API Endpoints
An API endpoint is a URL where users can access to our API.
Creating Endpoints (also known as routes) is really simple.
Syntax: app.<Request_Method>(‘ Endpoint ’, callback function)
Example: Suppose we want an endpoint named as posts that accept GET requests.
app.get('/posts', function(req, res){
  // ... do stuff !
})
The callback function has access to two parameters i.e Request and Response respectively.
So now you know how to create endpoints lets create some for our API.
// Endpoint 1
app.get('/api', function(req, res){
  res.send('Welcome to our API')
})

// Endpoint 2
app.get('/api/users', function(req, res){
  res.json(userData);
})

// Endpoint 3
app.get('/api/user/:id', function(req, res){
  const id = req.params.id;
  const user = userData.find(user => user.id === id);

  if (user) {
    res.json(user)
  }
  else {
    res.send('No User Found')
  }
})
Now, please pay a little attention to endpoint 3.
app.get(‘/api/user/:id’, function(req, res){
})
Here “: id” at the end of the endpoint is a parameter.
Suppose user types **www.example.com/api/user/1, **then the value of id would be equal to 1. you got the point!
We can access these parameters by typing req.params.id where req is the request which we received from the first parameter of the call back;
app.get(‘/example’, function(req, res){}) ;
Sending Response
To send a response to the client we use the res parameter.
res.send(“Hey There”);
or JSON Response
res.json(object);
In the end, we have to start our server by listening to some PORT and trust me this is also really simple.
Just use .listen function that accepts two parameters, PORT number and a callback function (which gets called when our server starts).
app.listen(3000, function(){
   console.log('Server Started');
})
In our example, we have used 3000 as our PORT number.
Congratulations 🎉! Now let's start our application
To start your server type
node index.js
in command prompt or terminal and your server would get started.
Let's test our API
Navigate to your favourite web browser and visit localhost:3000/api

Now let's test the users API endpoint.
Visit: localhost:3000/api/users

Last but not the least, let's test our endpoint three
Visit: localhost:3000/api/user/<id>
Example: localhost:3000/api/user/2
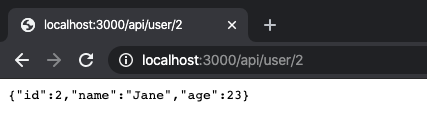
Congrats! 😍 You have build your very own first API.
Follow me on social media:
Github: piyushgarg195
Linkedin: Piyush Garg
Comments
Join the discussionNo comments yet. Be the first to comment.


